Combining systemd-networkd, libvirt and hostapd to emulate a computer network
One of my academic projects involves the creation of a private, multi-node and multi-tenant cloud infrastructure built on top of OpenStack.
The single most important property that the cloud environment should fulfill is that it has to be portable in terms of its network configuration. This is because the machines - which are no different than any off-the-shelf laptop - we are using to collectively build said environment are always connecting to different networks which all have their unique configurations.
So, why don't we roll out a software access point?
This article will present an implementation which combines the following three components:
- systemd-networkd – a network backend and a daemon for defining (often sophisticated) network configurations.
- hostapd – a daemon for access points that implements all the authentication mechanisms of the modern age, including WPA, WPA2, EAP, and more.
- libvirt – a daemon, toolkit, and set of APIs for managing various forms of virtualization technologies, most notably KVM; it is, as we will discover, a powerful system for emulating real-world networks and creating complex network topologies.
While this approach has so far worked reasonably well for us, if you're considering designing a software-based architecture such as this one, please understand the potential risks that it might entail, some of which are discussed later on in this article.
What exactly is it?
A software access point is very similar to the special-purpose device which it imitates. They are just as capable as a real access point and most computers and phones can become one.
Checking if your network adapter supports ap mode can be done with the following command:
iw phy0 infoVerify that "AP" is listed under the "Supported interface modes" section.
How is it done?
libvirt, hostapd and systemd-networkd are the only components we need to define a virtual network, wrap it as an access point and bind it to a specific virtual interface.
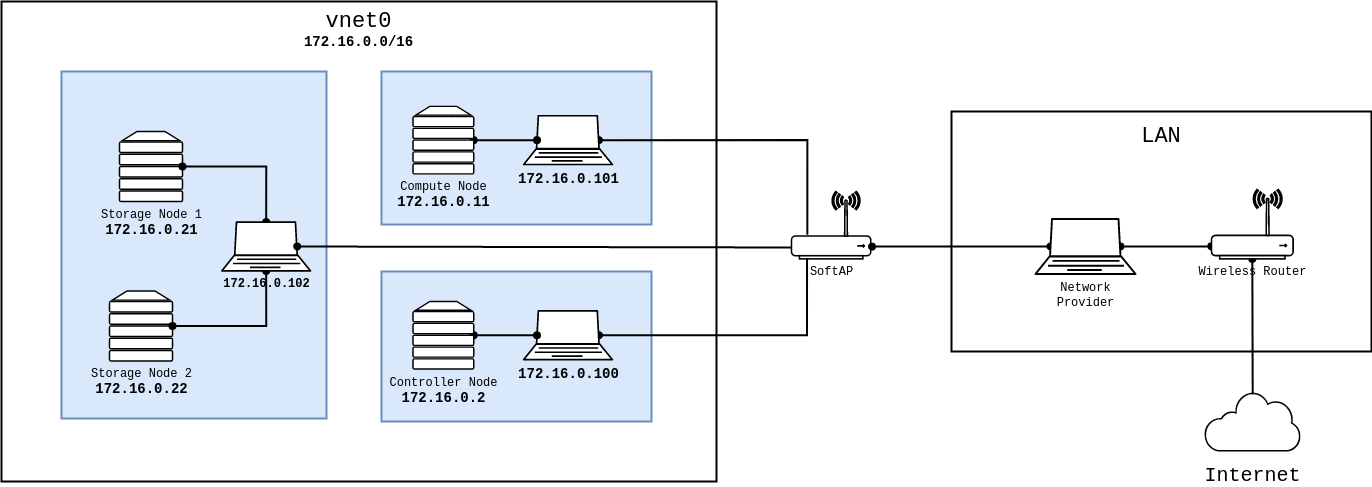
Here's a visual representation of the network that should give you an idea of the architecture we are going after.

Clients of the vnet0 virtual network are assigned a dynamic IPv4 address by dnsmasq, while the OpenStack nodes, should assign themselves a static IPv4 address.
Note that the virtual network provider should not use the same network address and subnet mask as the network it's connected to. Otherwise, there'll be two conflicting IP addresses and the virtual network will refuse to start.
The virtual machines are, what some might call "bridged" by their hosts onto the network, but behind the scenes, they are most likely on a different subnet with a router that's proxying ARP requests/replies for them, which leaves them vulnerable to ARP spoofing attacks, but that's besides the point.
Bridging is not possible using a wireless network card because we need to accommodate a fourth field for the radio receiver when 802.11, on the other hand, limits the AP to client station data frame to only three address fields: DA, SA, and BSSID.
- BSSID represents the MAC address of the radio transmitter
- SA is the source MAC address
- DA is the destination MAC address
As it turns out, a fourth address can be used to permit bridging over wireless. However, it's vendor-dependent and the 802.11 standard doesn't exactly specify how things are supposed to work in this mode.
Configuring libvirt
The following is the XML representation of the virtual network to which clients can connect and instantiate their virtual machines.
<network>
  <name>vnet0</name>
  <forward mode='nat'>
    <nat>
      <port start='1024' end='65535'/>
    </nat>
  </forward>
  <bridge name='virbr0' stp='on' delay='0'/>
  <domain name='vnet0'/>
  <ip address='172.16.0.1' netmask='255.255.0.0'>
    <dhcp>
      <range start='172.16.128.0' end='172.16.255.254'/>
    </dhcp>
  </ip>
</network>
Notice how the mode attribute of the forwarding element was set to nat, we do this such that no matter what network the portable cloud environment operates within, it should just work.
Be sure to change the name element and the attributes of the ip element per your requirements.
Next, we'll define and start the virtual network:
virsh net-define --file <vnet0.xml> && virsh net-start --network <vnet0>Configuring systemd-networkd
Before we enable the access point, hostapd needs an interface to bind itself to and that is where systemd-networkd comes into play.
You can't just give hostapd a managed wireless interface because that device will be enslaved by the daemon as it is bridged to some other interface. Instead, we should create a virtual interface for hostapd to control.
Note that:
- The configuration files of the systemd-networkd daemon should be placed underneath
/etc/systemd/network. - The configuration files for devices, links and networks all have their corresponding file extensions and man pages, e.g.
systemd.netdev(5)describes the syntax of.netdev, its configuration options and a plentiful of exeamples. - You can view the status and reload the configuration of the different devices and networks using the
networkctlcommand.
Defining the virtual network device
The first file we're going to create is going to represent the device that hostapd is going to use, the name of the file should follow the <name>.netdev convention, we'll call it softap.netdev.
The following section is going to match this configuration against an existing physical network interface, in my case that's wlan0.
[Match]
Name=<wlan0>
This next section defines the role of the virtual network device which in our case is wlan.
[NetDev]
Name=<softap>
Kind=wlan
Description=vNIC for a software access point
The last section is going to define how the virtual network device should behave with regard to its type, and ap is the appropriate mode for the network device we intend to deploy.
[WLAN]
PhysicalDevice=<phy0>
Type=ap
Defining the network
Now that the interface is set up, we can move on to the network-related settings, which follows the <name>.network convention
The first file we're going to create is going to represent the device that hostapd is going to use, the name of the file should follow the <name>.netdev convention. I will name mine softap.netdev.
The following section is going to match this configuration against the previously defined virtual network interface.
[Match]
Name=<softap>
This next section is going to tell the network to forward (or route) the packets that the host receives from the clients communicating via the virtual network interface while masquerading their IP addresses.
[Network]
IPMasquerade=yes
You're all set now!
In order to tell systemd-networkd to reload the new configuration, run the following command:
networkctl reloadWhen you verify the status of the interfaces, you should see an output similar to this:
IDX LINK     TYPE     OPERATIONAL SETUP
  1 lo       loopback carrier     unmanaged
  2 wlan0    wlan     routable    configured
  3 <softap> wlan     no-carrier  configuring
Note that until we use or bridge the device, the operational status of <softap> will continue to report no-carrier, the manual explains in detail the different operational statuses of systemd-networkd and their meaning.
Configuring hostapd
hostapd is primarily configured through the /etc/hostapd/hostapd.conf file, the daemon offers a plethora of functionalities so the file can is quite long. I will therefore cover only a rather tiny subset of its configuration options.
As previously mentioned, hostapd must be bound to a network interface that we'll bridge to the interface libvirt creates for the virtual network.
interface=<softap>
bridge=<virbr0>
Now make sure to check the status of the service for errors, AP-ENABLED is what you're after:
● hostapd.service - Hostapd IEEE 802.11 AP, IEEE 802.1X/WPA/WPA2/EAP/RADIUS Authenticator
     Loaded: loaded (/usr/lib/systemd/system/hostapd.service; disabled; preset: disabled)
     Active: active (running) since Sun 2022-12-18 04:49:29 CET; 8s ago
   Main PID: 36772 (hostapd)
      Tasks: 1 (limit: 23674)
     Memory: 1008.0K
        CPU: 27ms
     CGroup: /system.slice/hostapd.service
             └─36772 /usr/bin/hostapd /etc/hostapd/hostapd.conf

Dec 18 04:49:29 ideapad systemd[1]: Started Hostapd IEEE 802.11 AP, IEEE 802.1X/WPA/WPA2/EAP/RADIUS Authenticator.
Dec 18 04:49:29 ideapad hostapd[36772]: softap: interface state UNINITIALIZED->COUNTRY_UPDATE
Dec 18 04:49:35 ideapad hostapd[36772]: softap: interface state COUNTRY_UPDATE->ENABLED
Dec 18 04:49:35 ideapad hostapd[36772]: softap: AP-ENABLED
Results and reflections
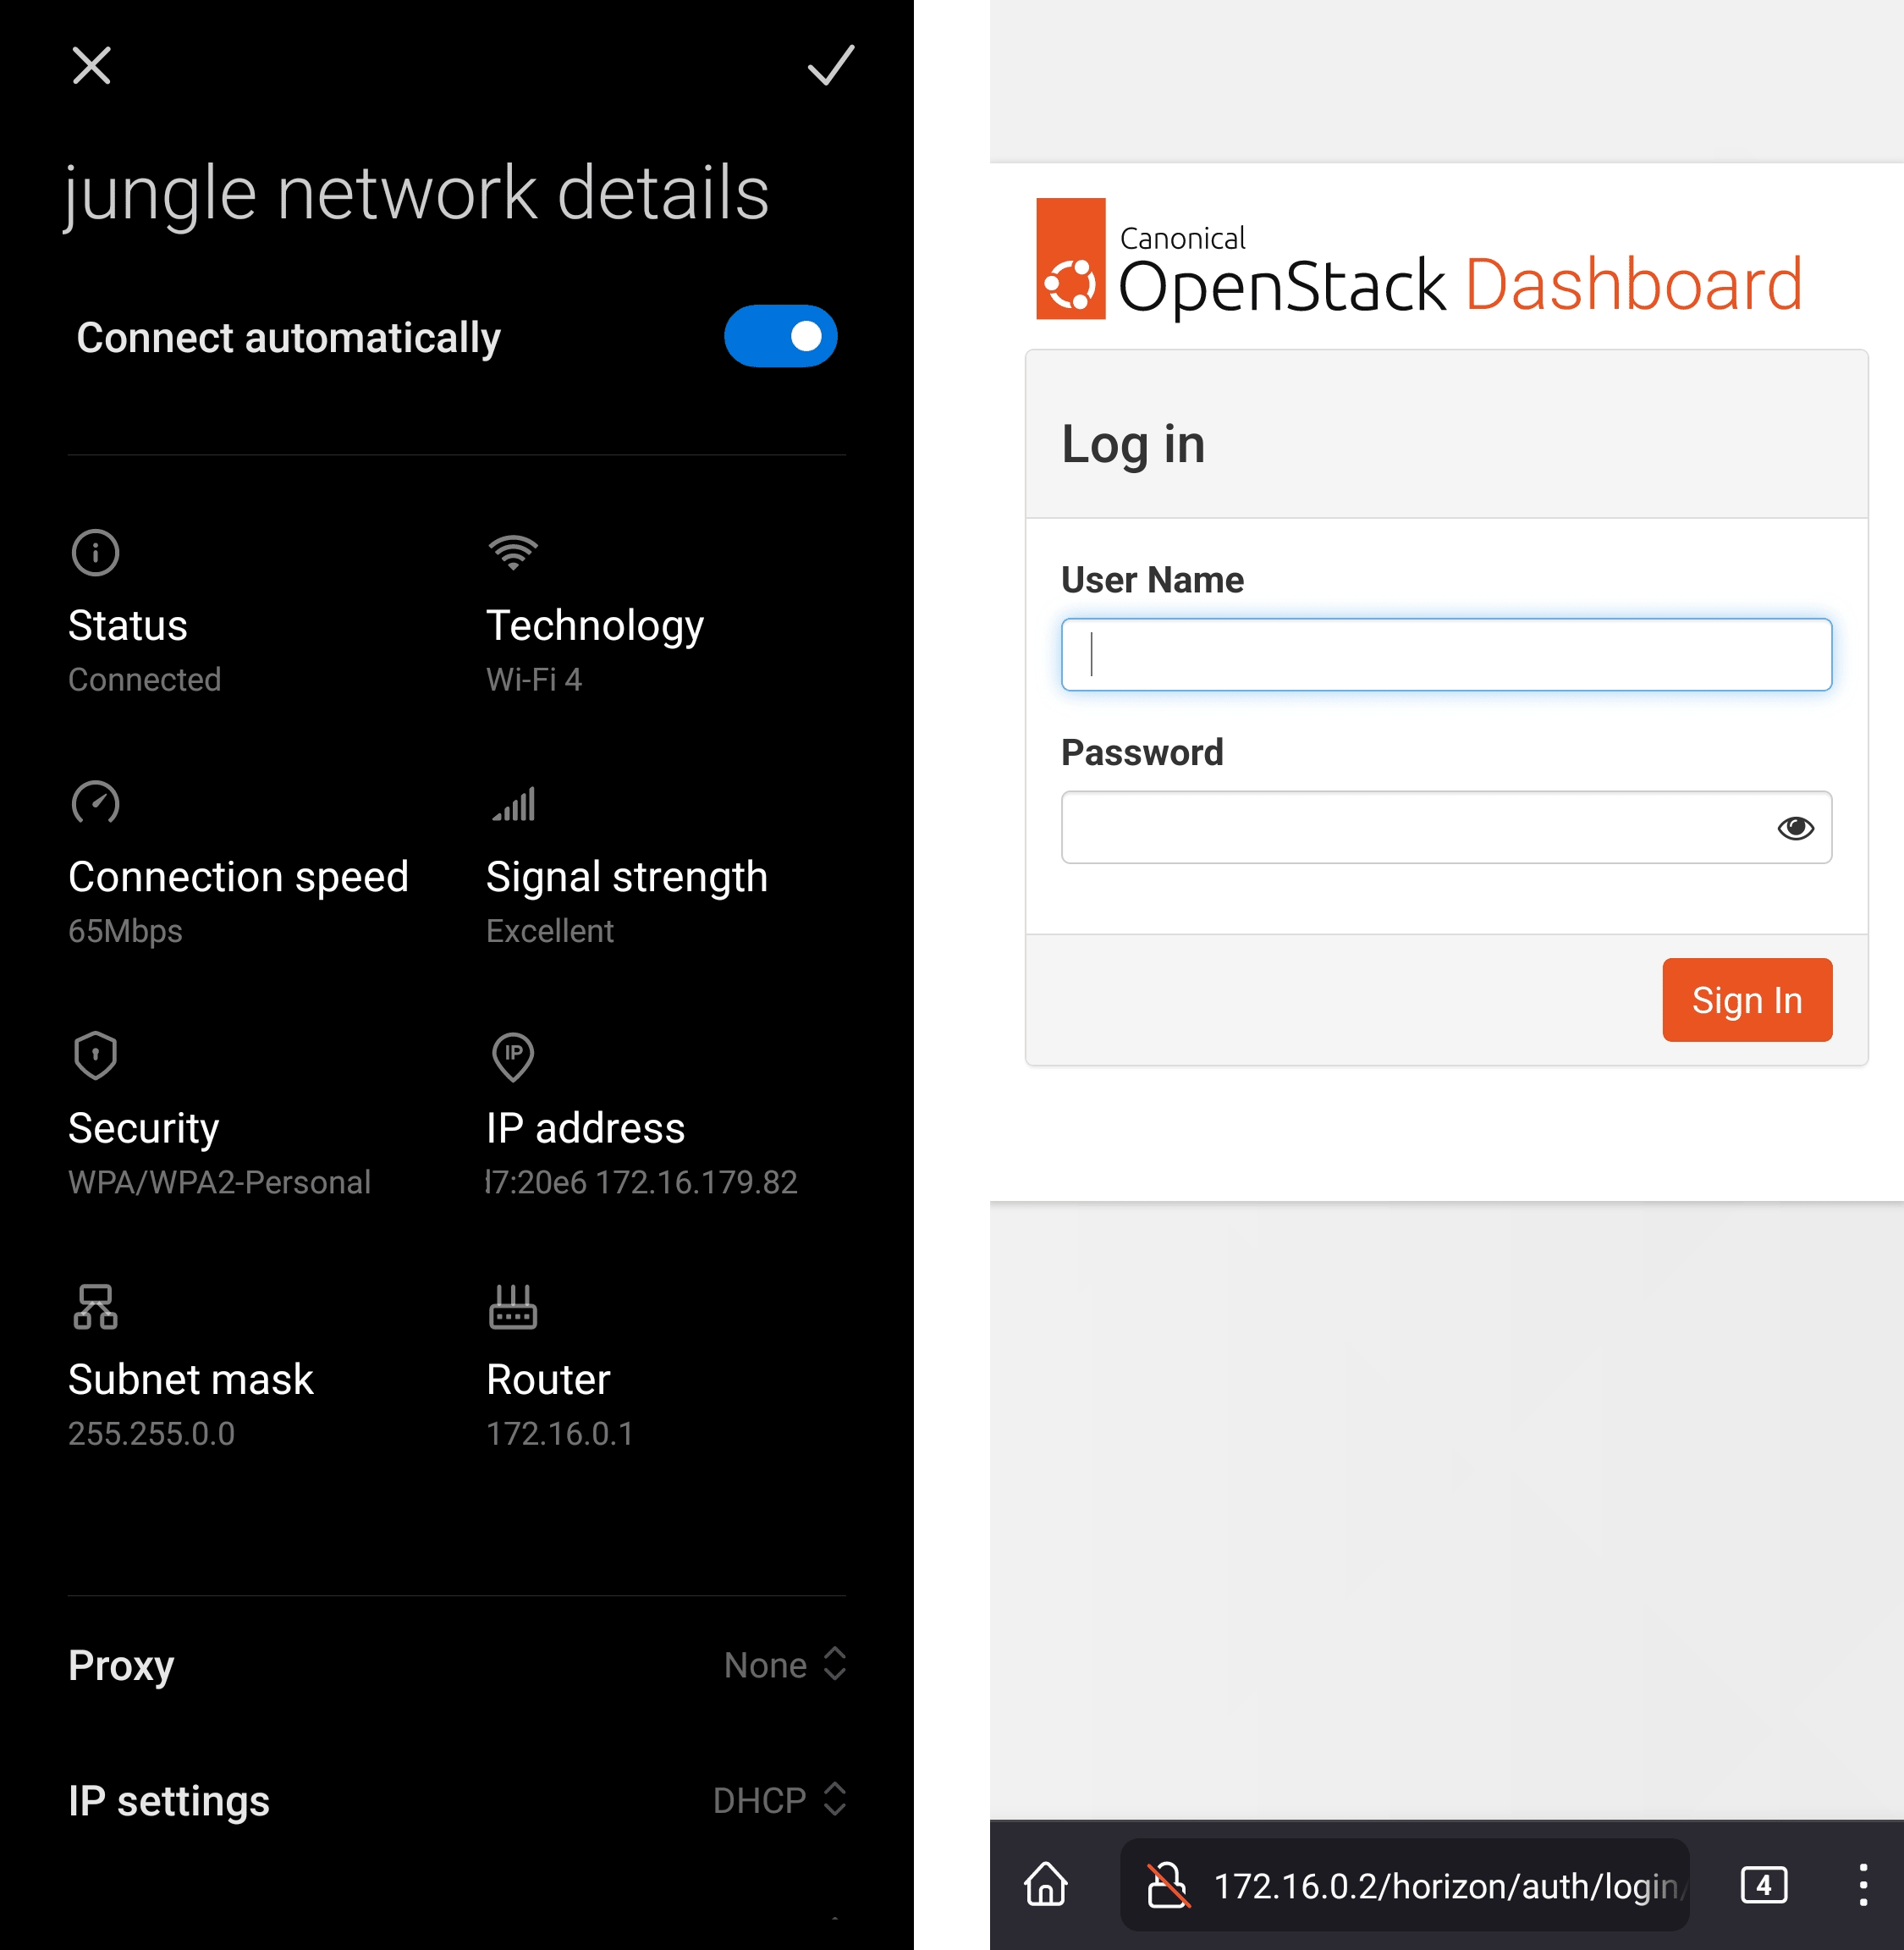
To show that everything works, I'll connect through my phone to the my new software access point - which I decided to call "jungle" by the way - and then visit the OpenStack Horizon dashboard hosted on one of the virtual machines.

Right now, the only thing protecting the network is the authentication mechanism of the WLAN, we should consider installing a firewall to protect the network from outsiders.
Because it is based on WLAN, traffic from inside the network is significantly slower than what a typical production cloud infrastructure might necessitate.
Furthermore, we are undeniably committing a grave mistake in terms of network architecture, there's a single network serving all of the machines (physical and virtual) which may at any point turn the proposed solution into a relatively disastrous phenomenon: a single point of failure for the entire infrastructure.
While this article explores an alternative network architecture, it should not yet be considered a definitive solution as only time will tell if that remains true, it does however answer every one of our requirements.
Caveats
hostapd has made my kernel panic on two occasions, though I didn't get the opportunity to investigate (nor was I able to reproduce) the issue. Investigating a kernel crash requires software like kdump, which I don't really care to set up at this time.
Apart from that, everything works as expected!
Conclusion
This venture has proven to a great extent how malleable the Linux kernel is in terms of its networking capabilities, and it just goes to show the unbelievable amount of variety in userspace.
RedHat - the authors of libvirt, systemd and a large collection of Linux userspace tooling - have cultivated a great community and built a lot of tooling to support Linux which evidently make it stand out, both in the desktop and server realms.
It has been wonderful getting to know the intricacies of these systems and using them as the basis for architecturing a flexible virtual computer network to support my academic project.